In this video, Colin demonstrates how to map chord tones across the fretboard in various 3-string configurations through the changes of “Autumn Leaves”.
Improvising well over chord changes can be a major hurdle to overcome on the guitar. In order to do that, we need to first connect our fretboard knowledge with some chord theory. In this episode, I’ll show you an exercise that you can use as a starting point to mapping out chord tones to help you know your guitar inside out.
With all the work we’ve been doing with getting to know our fretboard in the first four fretboard mapping videos, we’re ready to progress to moving targets, aka chord changes. But if you haven’t put in the work on those earlier exercises yet, go through those videos first, as they’ll make this exercise much more accessible to you.
Let’s start off by talking about some basic chord theory. There are 5 basic types of seventh chords that we always see: Major 7th, Dominant 7th, Minor 7th, Minor 7b5 (also called half-diminished), and Diminished 7th. By examining these chords’ construction, we can memorize the small differences between them, and that is our first objective. Major Seventh chords are generated by extracting the first, third, fifth, and seventh degrees from a Major Scale. Dominant Seventh chords use those same degrees, except the 7th degree is lowered by a half step. Minor Seventh chords are like Dominant 7th chords except the 3rd degree is lowered by a half step. Minor Seven Flat-Five chords are, you guessed it, like a Minor Seventh chord but with a lowered fifth degree. And the Diminished 7th chord is identical to a Minor Seven Flat-Five except the seventh is lowered by yet another half step.
I’ve provided a link below to a free PDF that you can download and use to practice spelling these five basic seventh chords in all 12 keys to help you memorize these chord formulas and become quicker at thinking of your chord tones.
Free 7th Chord Worksheet
Click below to download a free 7th Chord Worksheet PDF
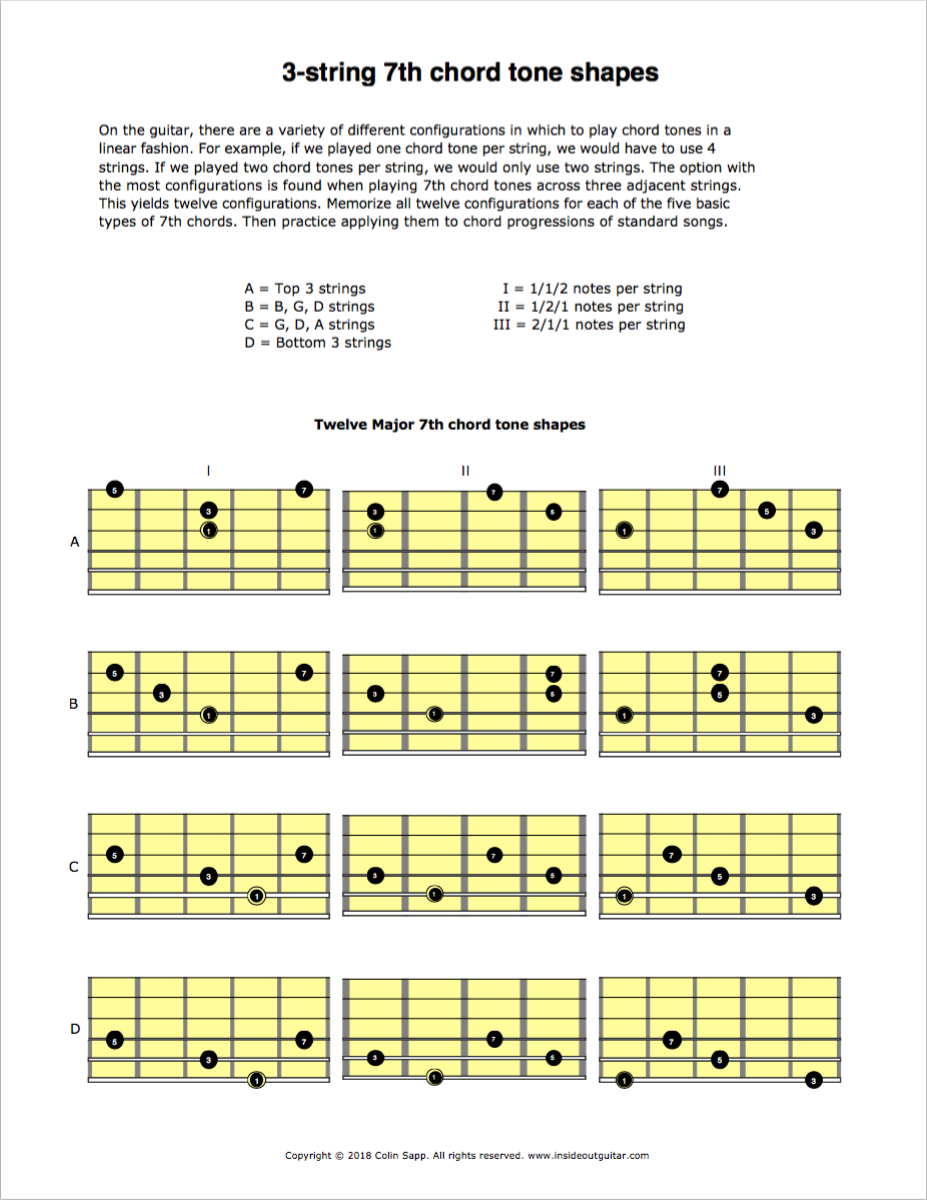
So let’s see what these look like on the guitar. We can organize chord tones in many different configurations on our fretboard. The most logical way is to align them across three strings. When we do this, we’ll have to put two tones on one of the strings to make all four chord tones fit.
This gives us three possible configurations:
- 1-1-2
- 1-2-1
- 2-1-1
Each one of these is usable, so it’s up to us to decide which one works best for our hand in a given circumstance. On a six-string guitar, we have four sets of 3 string groupings, so let’s label them from the highest sounding to the lowest. EBG we’ll call Group A, BGD will be Group B, GDA will be Group C, and DAE will be Group D.
I’ve written all of the different chord tone shapes for each of the five basic seventh chords out in a downloadable .pdf for you that you can find a link for below. These worksheets and notated exercises are available for purchase for 99 cents below.
Click below to purchase the 60 3-String Chord Tone Shape diagrams and transcribed exercises for this video. If you’re like me, memorization is much easier with a helpful visual reference.
[simpay id=”16″]
Now let’s apply all of this knowledge to a song with some chord changes in it. “Autumn Leaves” in the key of Gm has 10 unique chords in it. I’ve organized a five step approach in order to effectively map the chords of a song on our fretboard.
- Step 1: spell each of the chords in the song
- Step 2: map out a plan using shapes from chord tone Group A on our fretboard
- Step 3: map out a plan from Group B
- Step 4: connect the A & B plans without strict time
- Step 5: connect the A & B plans in time
So let’s work through those steps on “Autumn Leaves” together. The first chord is Cm7. Step 1: spell out the chord tones – C Eb G Bb. Step 2: find a comfortable fingering for it on our top 3 strings. I’ll choose the first configuration. That’ll be my A Plan. Step 3 is to find a comfortable fingering for that same chord on our BGD strings. I’ll go with the first shape again. This will be my B Plan. Now repeat those steps for the remaining 9 chords of the song: F7, Bbmaj7, etc. Step 4 is where we’ll explore how the A and B plans connect in different ways on our fretboard through the changes of the song, but we’ll do it without the pressure of playing them in time. Here’s one possible solution.
Play through the song several times for Step 4 and improvise different ways to connect the shapes. After you’re feeling confident with that step, it’s time for Step 5, where we try the same thing in time. I like using a backing track, but you could do this with just a metronome if you prefer. An important point to keep in mind is that this exercise is meant to be played with different chord tone shape combinations each time, so now I’ll play through the song improvising a different combination than before.
Remember to start slowly and gradually increase the tempo over time to challenge yourself. When you repeat the exercise, strive to find new ways to connect the shapes across your fretboard. Once you’re comfortable with the A and B shapes, move on to mapping the C and D shapes on your other sets of strings. After that, you can practice improvising the chord tones within the shapes in a different order. For example, instead of playing the chord tones in the 1,3,5,7 order, you can play them as 3,5,1,7, or 7,3,1,5, etc. There are 24 permutations of those four tones, so be creative with how you practice them. I’ll demonstrate one more chorus for you a little faster using different chord tone shapes than before across all string sets and using permutations.
Now it’s your turn to dive in! Carve out some hours to shed these chord tone shapes and apply this exercise as a first step to gaining improvisational command of any song with challenging chord changes. Thanks for watching, happy practicing, and I’ll see you next time on Inside Out Guitar!
Follow Colin Sapp on Instagram